Tag as favorite Previous Topic Next Topic
My Plastic Lamellar project.
kirstar Offline
#1 Posted : 01 October 2014 10:26:42

Rank: Advanced Member

Medals:

Groups: Registered
Joined: 31/03/2010
Posts: 80
Location: Northampton UK

Thanks: 1 times
Was thanked: 16 time(s) in 11 post(s)
My wife and I as a project to help with my no LARP issues (stupid broken foot) decide to make some lamellar armour. We looked around and decide that leather was expensive and we would have to cut our own plates. Metal was expensive and heavy so went for plastic pieces instead.

I did lots of research and discovered that there is very little out there on making it. So decided to keep a project log and also thought that fellow larpers may be interested.

At first I tried to use facebook to log it but facebook is being crap. Then tried my faction forum but you need to register to see the thread and then you need to be authorised by an admin etc etc. So as I only play LT and you can see the LT forum without registering.....

The parts come from the USA and we got hit by customs charges so 20% + £8 and it took 3 weeks to arrive.

Click on a thumbnail for a larger image

Once it arrived it was evident that it had been used as a foot ball. Luckily even though customs had opened the packets and left the plates loose none had been lost.


I wanted to make sure everything was delivered as the package looked small. But individual plates 100 to a bag and bundles of paracord. Quick count and its all there.


Most of the bags are packed neatly but it looks like customs have had fun. Also pieces of armour are not protective. I wonder if they mean bullet proof? This is the US


A quick and dirty first try. Its fairly easy but looks like it will take time. One thing of note is that some pof the pieces have a small sharp tag at the top from the moulding. A quick swip with some sand paper and its gone. You can do 10 or 20 pieces at a time so not time consuming. Would not want the armour failed at weapon check.


Here is the back with thread pattern and a lighter to scale. The diagonal thread pattern seems to most popular online for some reason.


Paracord is almost impossible to thread unless you melt and seal the ends. I discovered that if you melt the last cm or so it is even easier to thread. Leftmost in the pic.


As this armour will be for an eventual dwarven character and as anyone who knows Yurgen knows dwarves like gold so the armour will be gold coloured. Here is the start. With the hardend end of the para cord its possible to thread two plates at once.


I used this pattern. The pieces are not the same design exactly but close enough.


Once you have a complete row you need to make another then join them together.


Thread from behind using the top hole. then the bottom.


When you are deciding on cord length. Use about 3 times the length of the row. You do not want to end up short like this.


But knowing I would make mistakes to start I didn't cut the cord so was able to fix the issue.


Her is the first two rows. We decided on a silver edging.


And here is the front plate for the armour. I think it looks good. One thing to remember is COUNT and COUNT again. I do not have a picture of the horrible muck up where we were two plates short on a row and didn't notice until we had joined it to the rest. That was a waste of an entire hour as undoing the threading is harder than tying it.


and the back. We may makes some small changes hence the long cords left over to allow for adjustment as I think I make it to big this first try.
Drace Lenoir
House GryphonDwarf
Captain of the Lifeguard.
Marshall 318

kirstar Offline
#2 Posted : 02 October 2014 09:10:39

Rank: Advanced Member

Medals:

Groups: Registered
Joined: 31/03/2010
Posts: 80
Location: Northampton UK

Thanks: 1 times
Was thanked: 16 time(s) in 11 post(s)
Part 2.

Now that the front plate is finished I am starting on the back.
First thing to do is to count out the required number of plates then put them on some string to they do not get lost or mixed up.


If there was one thing that I learned from this is that nit is easier to make the rows than it is to attach the rows together. So here are some completed rows laid out in their eventual positions before they are joined together.


I had an idea about shoulder straps so quickly connected some rows together then made some simple straps.


Its the connection to the front and back plate that is interesting. The large hole and the lower of the two holes line up exactly to the 1st and 3rd hole on a row. Awesome :)

This is just a test. I have some ideas on how to make it look really good.


Now you will notice that on the right where the shoulder straps connect there is a spare plate as if the strap is too long. This is on purpose as I am still getting a feel for how long the strap needs to be and longer is better than shorter.


The harness so far + the completed but not connected rows. You can also see my foot in its cast (stupid broken foot) which is part of the reason for this project in the first place.


Ta DA!!!!!
The basic harness sort of complete. No straps, no pauldrons, no tassets, no tabric on the inside or leather edging, no permanent knots etc. BUT it looks the part.


My wife is a slim lady, But as we will be making a set of lamellar for her as well she has recently purchased a brand new gambeson. It is thick and new and makes her a lot larger than normal. This harness is sized for me and I am not a small person so with the gambeson it will almost fit her.
Anyway. As there are no straps yet we are using a belt to hold everything together.
From the front.


From the back
Drace Lenoir
House GryphonDwarf
Captain of the Lifeguard.
Marshall 318

kirstar Offline
#3 Posted : 15 October 2014 10:06:03

Rank: Advanced Member

Medals:

Groups: Registered
Joined: 31/03/2010
Posts: 80
Location: Northampton UK

Thanks: 1 times
Was thanked: 16 time(s) in 11 post(s)
update.

Sorry for delay in updating but was ill.

Not actually done that much as have been waiting for supplies.

But...

I have made my first draft of shoulder straps which ends up looking like this.


Trouble is my first draft had issues.


And was loose.


But. 1 plate long is 3 plates wide.


Which will allow me to make a better connection,


Had a sudden idea about the shoulder straps. Maybe I can make them look better


Plenty of flex. This looks good.


I think silver on silver looks best. Here is a comparison


One issue I have is making the cord to tight. My wife makes comments about Marc crush etc. So as I am starting on the pauldrons which I envision as being alot more flexable I decide to make a tool to keep the spacing just right.


Basically its 5 plates tied together


And when you are contructing and joinging plates you cant make it to tight. I think I did well on this.


Once I have the rows I want to join them. Now ther is the same risk of making them to tight so a paint brush comes in useful. Cant get it to tight now.


Here is the pauldron. Notice how flexable it is.


Flexing length ways


And over my knee. You can see how I tied the top to help form the bowl like shape.


And the finished pauldron. Notice how the tightly tied top and bottom force its shape.


And here is a pic of me. I do nto photo well when I am feeling ill. But you can see how the pauldron is supposed to look. I may change the design of course but will see.


No updates until the leather I ordered arrives until then....
Drace Lenoir
House GryphonDwarf
Captain of the Lifeguard.
Marshall 318

kirstar Offline
#4 Posted : 28 October 2014 22:55:26

Rank: Advanced Member

Medals:

Groups: Registered
Joined: 31/03/2010
Posts: 80
Location: Northampton UK

Thanks: 1 times
Was thanked: 16 time(s) in 11 post(s)
And another update.

Its being slow because I am inhaling the Honor Harringtono Series from David Weber and I am currently on book 12. Its hard to put them down.

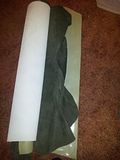
So the leatehr has arrived. Nice and cheap. Have some suede which I have not thought of a use for and some shiny horse hide. Its sort of greyish in colour.


So the leather is to edge the armour and it catches my hair and doesnt look very good.
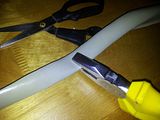
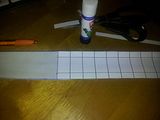
So first I cut a strip of leather the right size (4.8cm wide)


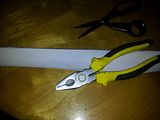
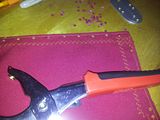
Now I use a pair of pliers to make a crease :)

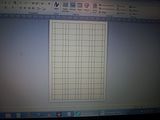
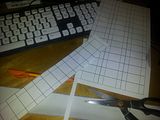
Using MS publisher I make a template so I know where the holes will be. I would give you the dimensions I used but I cant remember. I have it saved somewhere but cant find it.


Printout and cur first strip. i will put a hole where the lines cross.


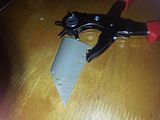
Lets see how big a hole I need. 4th largest on the cheapy ebay punch


Line up the leather to make sure its large enough etc


Quick test with one hole.


Using pritstick to gluye the pattern to the leather. It does come off afterwards. I did test it.
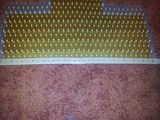

Start punching.


After the paper is removed. Note. Do not use large amounts of pritstick as it will stick.
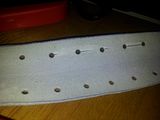
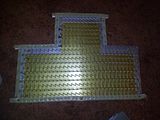

First edge done


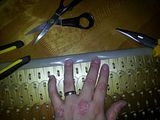
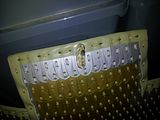
Armour from the back. Most edges done. Thing is it looks rubbish. Lets find some material to hide everything


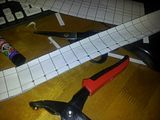
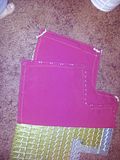
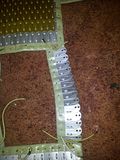
And here is the only material I can find. Line it up and use a paint pen to mark where I will need to punch the holes. Notice I have doen the corners already.


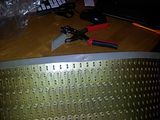
And punching holes in fabric with a leather punch. make that cheap and nasty leather punch from ebay that is now an ex leather punch as it all bent from the stress. Waste of £2.50


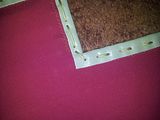
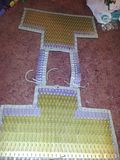
And the dging and the fabric. Looks very good.if I do say so myself. One thing to watch is the corner here. there is over lap so you will need to cut the leather so it can line up correctly.


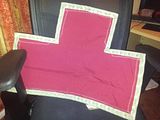
First piece done. It is looking very good now.


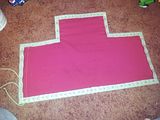
2nd piece done. you may notice this looks more baggy. This is actually the third piece of fabric. The first was a bit small but did stretch. the 2nd was way to small and the 3rd a little big. Oh well teach me to palm off the work to my mum on the sewing front.


The top of the front. I made a nice little platted ring :)


Just starting the leathe edging for the shoulder straps.


And both shoulder straps.


When I finish the shoulder straps will post some more.

One thing I have noticed however.

I orderd some straps and some buckles from ebay. Its perfect for the closing mechanism. THing is i should of attached them whilst I was putting the armoour together. Doh'


Drace Lenoir
House GryphonDwarf
Captain of the Lifeguard.
Marshall 318

kirstar Offline
#5 Posted : 06 November 2014 11:40:09

Rank: Advanced Member

Medals:

Groups: Registered
Joined: 31/03/2010
Posts: 80
Location: Northampton UK

Thanks: 1 times
Was thanked: 16 time(s) in 11 post(s)
Next part.

I have now finished the shoulder straps.
If you are wondering why everything has taken so long. Well lets just say I have tried many many variations.


One thing I noticed is that because I have put the backing fabric on and trimed the cord and locked the knots with glue etc I now have an issue about how to attached the straps to close the armour. I could use ties but they look silly. SO I am going to use straps. 1inch wide 4mm thick leather from ebay and 1 inch buckles from ebay as well. You can tell I am from the UK. We are the only country that uses imperial (english) measurements and metric at the same time.


Close up of buckle. Very good quality and price. Got 20 for £10


My first try making the straps. Cutting the hole for the buckle with a punch is not the best.


The buckle doesnt sit right


I think I may need to rethink how I do this.


Yep. Prototype is OK but needs refining and actual template. I forgot to take pictures of how bad it finaly looked but punching holes free hand was a disaster.


Whilst I remember. Rivets and stuff including anvil etc from ebay again.


Lets break out publisher again and make some proper templates.


Cut leather straps to size.


Prit stick then punch and you end up with this. As you can see where the lines cross is where I punch.


Finished male (tongue) side. I know the holes are differently spaced but all will become clear.


And the female (buckle) side. I used a razor edge to cut the hole for the buckle this time and then punched the ends. Is alot better and cleaner.


Looks a lot better now. Have riveted as well.


Now the fun part. How do I connected the straps to the armour without taking it apart again. Could I drill the plastic ? Nope.
Suddenl;y I had an idea. Lets sew it on.


Even if I do say so myself this is a great idea and is not desperation because of a mistake. Honest.


I hope its obvious what I am doing here. What you cant see is the effor it takes to thread these through the loops. They are very tight.


And here you go. Guess who forgot belt loops. So some spare cord melted into a loop and it looks realy good. Almost like it was planned from the. Actually it was ignore the previous bit about forgetting and stuff.


I do plan to trim those cords.


And the armour free standing.


And a selfie. I am realy crap at selfies. Took over a dozen tries and this is a picture via a mirror as well.

Drace Lenoir
House GryphonDwarf
Captain of the Lifeguard.
Marshall 318

Tag as favorite

Forum Jump  
Users browsing this topic
Guest

You cannot post new topics in this forum.
You cannot reply to topics in this forum.
You cannot delete your posts in this forum.
You cannot edit your posts in this forum.
You cannot create polls in this forum.
You cannot vote in polls in this forum.

Theme created by (northwind)
Powered by YAF | YAF © 2003-2009, Yet Another Forum.NET
This page was generated in 0.144 seconds.